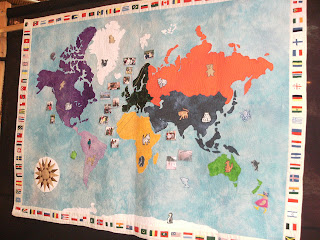
Monday, 10 September 2012

The Quilting Show

Travelling to the quilt show was full of anticipation for me as I wanted to see the winning quilt in my category more than anything else.  The show itself is fantastic and truly innovative: you get to see  so many creatives' work and become truly inspired.  The workmanship of some of the pieces are excellent and I know that something like that would take me years to acquire - hence that is why we get the winners because they are at the top of their game!

My Quilt

The winner of my category


My favourite - the winner of the Pictorial Category

 You do need a whole day to see and appreciate all the exhibits.  Everyones' work is shown - no matter what their level.  My pictures don't do justice to some of the quilts - you really need to be there to appreciate them.

Other winners


 Some of my favourites


I hope my blog inspires you to either enter the competition or visit the festival.


The end game

 My sincerest apologies for all those who were waiting to view the final piece: too many things happened which distracted me from finishing this blog!  First, there was the excitement of the actual competition, in which I didn't win, and then, running up in the rear, was my holiday to Hong Kong.  So all in all, too much going on at the same time!  My New Year's motto was to finish what I started, so ......


My final masterpiece


Friday, 27 July 2012

The Art of Quilting

Quilting is an art form within itself; people produce magnificent pieces of art and devote a phenomenal amount of time to it.  These people are true artists.  Do I fall into that category, I ask myself - NO.  I am too impatient and sometimes get really frustrated when things don't go my way.

Firstly, I managed to break the walking feet (which costs around £40, so gonna look on EBay to find another for preferably less as it didn't belong to me!). How did I do that?  Well, I set up my machine with the walking foot attached - a walking foot keeps the layers of fabrics together and prevents the top layer from 'walking' forward - then decided that I didn't need the spacing bar as I was going to sew in the ditch (seam).  Instead of taking the foot off the machine, I tried to pull (more like wriggle) the bar from out of its housing, thus putting the foot under a lot of stress by the movements and breaking off a small but vital piece!  I decided that the foot would work without it but I was wrong!
Bernina walking foot

So now, no walking foot, what am I going to do?  How will I control the layers?  Eventually I attached the buttonhole foot as it has a wider space in the middle and did a lot of pushing forward whilst sewing.

Next, because I had taken a shortcut and not sewn vertically down my quilt, I had too much movement!  They say the devil was very active on that day!  Nevertheless, I managed to simply sew in the ditch of my quilt, it took a while but I eventually finished.  I considered quilting random patterns on the long plain pieces but decided that there was enough to attract the eye and not to give myself any more stress but more than anything - not to tempt fate! 

I have not worked on such a large piece before: the only other quilt which I had made was for a baby's cot and I loved doing it - it was small and manageable.  Imagine rolling up your double (I think mine feels like a king size) duvet and sewing straight lines in different directions - very hard.  It is times like these that I long for a quilter's machine because it has a wider arm space.  Remember, any challenge, we creatives can overcome it and I think I managed to overcome the major ones.
With the quilt quilted, I decided on the binding, looked at a few books on how to get mitred corners (but had to work it out by myself) and added the binding; I must say I am very pleased with the result.

Isn't it funny how trouble happens in threes - my machine decided to literally grind to a halt (you should hear the sounds!) whilst I was sewing the hanging sleeve and no amount of oil could cure it!  Arthur (my machine mechanic), where are you?  Luckily us creative types always have more than one machine, so I took out my other Bernina (I have 2 Berninas and 1 Janome) and finished my hanging sleeve and carrying bag. 
All bagged and ready.
The quilt is finished, clipped and dusted for loose threads, and ready to go!  I am debating about revealing the finished product - I need some encouragement from you all!

Gel pads needed!

The top layer of the quilt is finally finished. When that happens you breathe a sigh of relief and count the number of days that you have been lovingly working on it, and it's not that you are glad to be finished with that part, it just seems as you were never going to be finished; I think that is called 'impatient'.

Now comes the process of the sandwich (remember, not the eating type!). One thing needed is space, and a lot of it: you need enough space to lay out the top layer; the wadding (or batting as called in other countries); the under layer, which can be plain or decorative; and enough space to wander around the quilt smoothing out creases and straightening edges. If you don't possess a humongous table or know someone who does, an investment in knee pads is a good idea as you will be on your hands and knees for a good while, fixing the layers.

The quilt sandwich


Once the layers are fixed then quilting pins are needed to hold them together before it is tacked; these could be specialist bent safety pins or long pins with a cute little flower on the top.  The tacking takes forever and you realise why people quilt with the pins still attached. The tacking has to be in horizontal and vertical rows. The one plus which I can say about hand-sewing is that it is quite calming and relaxing - it should be recommended for those who suffer from hyper-activity!


Once this is all finished, The quilt is then rolled up, like a sausage, and ready for quilting on the sewing machine.

Thursday, 19 July 2012

The Ingenious of the Creative Mind

Only 12 days to go and there still seems a lot to be done on the quilt!  Do you ever get the feeling that the more you do, the more there is to do?  I am working on the outside perimeter and have produced the patches for the top and bottom of the quilt but not for the sides as I want to incorporate the Adinkra symbol again and work on more styles of the Celtic Knots.  It is like at the last stage you get really creative but haven't got the time to explore that creativity - maybe I could have started earlier - maybe, but everyone knows that there is nothing like a bit of adrenaline and desperation to get excellent work out of people (especially me - I work extremely well under pressure!).

This morning I used my home-made light box (my window) to transfer the Celtic knot pattern onto the cloth and now I have to combine it with some muslin (a fine open-weave fabric) and hand stitch the channels of the patches.
My light box!
When an artistic and creative streak is part of your make-up, your imagination can compensate for anything which is lacking!  You are resourceful, can come up with new ideas from the remotest of possibilities and can think 'outside the box' which is always a great plus.  you will find that people also gravitate towards you for various reasons, mainly because you are self-sufficient and possess qualities which they aspire to; they always want you to do something for them but because you are adroit; you rarely reciprocate. I have come to the grand conclusion that creative minds are the pillars of society!
completed Celtic Knot


I plan to have the top layer complete before Friday so than I can start the quilt sandwich (top layer, wadding and bottom layer and not to be eaten!) and do the actual quilting at the weekend as I now have more free time available to me.

Monday, 16 July 2012

Making the bigger picture

The constraints of time is a major factor in the planning and the amount of work which goes into a quilt; if everything is prepared, then a whole day spent at the sewing machine can produce wonders.

I have completed all my squares for the first two rows from the central image and have carefully cut out my fillers; now all I have to do is sit at the sewing machine and join everything together.  The only technical bit to this is making sure that everything is lined-up - this can be very time consuming.
Quilt with patches and fillers joined.
I have put the quilt together and it is looking good (my brother is coveting it!) and I am thinking 'shall I leave it this size?'  But I haven't attached my Courthouse Steps patches as yet and that colour scheme is a bit brighter than the central one, so I must rally on!

There is a lot more to quilting than one initially thinks.  A vast amount of thinking goes on behind the process - it is not just sewing pretty squares together, it is also planning and co-ordinating colours, patterns and design.  I got to this stage and it took me days to move on to the next as I had to think about how it was all going to fit together (the quilt mathematician), what other pattern did I want to incorporate into the design and also the size restraints.  After a good few days of drawing , measuring and deep thinking, I finally decided on the overall design, which was not too far off the original, and what I was going to do to fill the spaces.  All I know that time is going and if I don't get a move on, it will leave me and my creation behind!


Tuesday, 10 July 2012

The Quilt Mathematician

 Maths is an essential tool in the making of a quilt.  You would think that all you have to do is to sew fancy patterns together and voila!  A quilt - not so.  Now that I have completed the central image, the next step is doing the patchwork blocks: patchwork stripes and courthouse steps, I believe.  The first thing which I have to do is to cut out lots and lots and lots of measured strips in a variety of fabrics.  Cutting out strips is really easy, as long as you have a rotary cutter, a quilter's non-slip ruler and a self-healing mat (I love the name, basically it is a mat which you can use a sharp blade on, the pizza-looking rotary cutter, and it doesn't score the surface) then Bob's your uncle!  Stage one completed: lots and lots (I do love the word) of inch and a half strips.

Combining the colours is hard but not impossible. As I told you all, I really went overboard in my buying of African fabrics: so overboard that I was drowning in them! Now is the time to put them all together to create something pleasing to the eye. Whilst cutting out the strip, I pondered on that problem; was everything going to be garish or would I be able to do it tastefully? The solution was to sew it up and see.

I combined shades together, keeping in mind that I am going to be working on two designs (I've also seen another which I do like called Seminole) and then sat at the sewing machine and produced endless strips and combinations of cloth.  Doing this really bring to mind that '80s advert for mashed potatoes; the aliens amusingly, then hilariously observe us humans peeling, boiling and mashing the potatoes and then combining it all back together again - I remember the punch line 'For mash get Smash!' - well doing patchwork is a bit like that.  You cut up endless pieces of cloth, sew it back together in some fashion, cut it up again and then sew it back together in a different fashion!!!   Some people do ask why, well the only answer that I can give is the satisfaction of creating something unique.  In this stage the important equipment is the cutting mat, rotary cutter, sewing machine and ironing board because a lot of cutting and putting back together goes on.  Overall I was very pleased with the finished effect: very nice!


Courthouse Step
Patchwork Stripes

After creating all those blocks my next job was to place it around the central image: where is my calculator!  I measured the central image and the patchwork stripes and calculated how many were going to fit around it, all good so far. This was working out a bit too perfect and alas, the inevitable, I was a bit short on the sides. This is why I say that you have to be a mathematician to be a quilter because you have to work out how everything will fit together and if they don't you have to factor in fillers like posts and sashings. Sashings are columns or strips of fabrics which separate individual blocks and posts are little squares which goes on the corners of these strips. The maths comes in when you have to calculate available space and the size in which to make these fillers which is not easy as a majority of patchwork blocks is calculated in inches (and I tend to work in both); then you have to find suitable fabrics for these posts and sashes and you are liable to end up buying even more fabric and I definitely have enough of that!

Patchwork and quilting is an expensive hobby as one is always buying: I've had to go out, back to Fabrics Galore, and buy extra fabric for my sashing and then had to change the colour combination as they had run out of the one which I had originally bought. And you know what the next sentence is going to be: I saw another bit of fabric which I really liked and could blend into the quilt, so being of weak purse - I bought it!

My maths skills is not great and I will do something about it this year - a maths course!  I had calculated how much space I had available, so I proceeded to make the fillers for it and attach them to the patchwork blocks, only to find that I was still short!  What had gone wrong?  Oh yes, I forgot to minus the seam allowances in my calculation!  Well, central image, you are now going to become a bit smaller because what I have just labouriously completed has to fit onto you and I ain't unpicking!